RESIZING PICTURES TO MAKE AVATARS
| There are several ways to resize pictures to fit avatars, however, there is only one way that will ensure that the avatar is not distorted in some way. We have all seen avatars, that seem to be stretched in one direction or another, this is because it was not sized properly. |
|
The proper way to do this sizing, is to pay attention to the Aspect Ratio of the
avatar. The aspect ratio is defined as the relationship between the width
and height of the avatar and is expressed as a fractional number generally.
For example, for a Mega AV, whose width is 102 pixels and height is 116 pixels,
we obtain the aspect ratio by dividing 102 by 116, resulting in an aspect
ratio of .879
When we resize our original picture to fit this avatar size, we must maintain
that aspect ratio, otherwise the final avatar will be distorted.
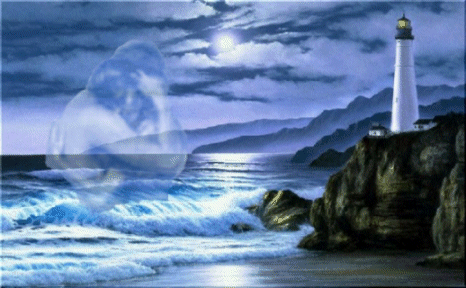
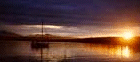
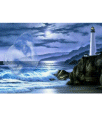
The above image is 466 wide x 288 high and thus has an aspect ratio of 1.618, simply
resizing it to 102x116 yields the following image.
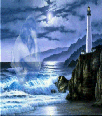
Notice the lighthouse, how skinny it is. The image in general is skrunched in width, eg, distorted. This is because we took the original image and tried to cram it into a space where it just will not fit. It is like taking a rectangle and trying to make it fit in a square hole, it just won't fit.
So... What is the solution? Aspect Ratio. Download and open the original image
above in PSP. Choose your selection tool and place the cursor in the image
at (31,1)... drag the selection rectangle down and to the right until the cursor
is at (278,282). BEFORE you release the mouse button, the lower left
corner of the PSP screen should show the following,
NOTE: Click on the line above to see what all the numbers mean.
Now click on EDIT->COPY then EDIT->PASTE AS NEW IMAGE. This new image
will have a width of 247 and a height of 281 (aspect ratio of .879)
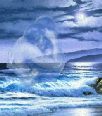
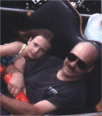
Notice the lovers and compare them to the last image. In the last image, they are skrunched horizontally, in this image, they are not, this is because in this new image, we maintained the aspect ratio to fit a Mega AV. It is not necessary to get the aspect ratio EXACTLY correct... close will do just fine. For the .879 aspect ratio, generally anywhere from .870 to .883 will be totally sufficient. You must note however, that if you do not get the aspect ratio EXACTLY, then when you do the resize, you must also turn off the "Maintain aspect ratio" checkbox. This will be ok and not be noticable if you have the aspect ratio pretty close. BUT, you say, we did NOT get all of the original image to fit into our AV. You are correct, we didn't. WHY? Because if we take an image that does not have a .879 aspect ratio and try to fit it into a image that does have a .879 aspect ratio such as a MEGA, then it will become skrunched. What we did was to take a portion of the original image, a portion that DID have the .879 aspect ratio and copied that portion so that it would fit into an AV without distortion.
BUT I WANT THE WHOLE IMAGE!!! Ok.. here is are TWO ways to do that also.
THE FIRST METHOD - easier but only gets MOST of the original image in the AV
Create a NEW IMAGE, Width = 408, Height = 464
Place the cursor in the original image at (33,1)... drag the selection rectangle down and to the right until the cursor is at (441,284). BEFORE you release the mouse button, the lower left
corner of the PSP screen should show the following,
Now click on EDIT->COPY. Then click on the new image and click EDIT->PASTE->AS NEW LAYER.
Now click on IMAGE->RESIZE and resize the image to 102x116. You should then
have the following.
Now you have the complete original image in your AV, but you also have
a top and bottom border. You can fill this in however you like.
THE SECOND METHOD - harder but gets ALL of the original image in the AV
First, we have to determine the size of the new image we need to create. That will
be determined by the size of the original image.
SCENARIO 1: The width is larger than the height in the original image.
The new image size will be:
WIDTH = width of the original image (in our case 466) SCENARIO 2: The height is larger than the width in the original image.
The new image size will be:
HEIGHT = height of the original image
Create a NEW IMAGE, Width and Height as calculated above.
In both cases above, you have the original image in your AV, but you also have
unused space either on the top and bottom or the sides. You can fill this in however you like.
You now know why we have letterbox movies on tv.. because of ASPECT RATIO. That of the
wide screen movie theatre is different from your TV. When the format the movie to fit
your TV, there are two choices, omit part of the original (as we did with our first AV)
or put it all in there WITH unused space at the edges.
The following table gives the sizes and aspect ratios of various AV's and Tours. |